Teleconferencing | CU-SeeMe
CU-SeeMe
In this section we demonstrate the use of a freeware teleconferencing tool, CU-SeeMe, that is available for both Macintosh and PC platforms. CU-SeeMe is a clever play on words, since it is phonetically rather descriptive of what the software does, and it was developed at Cornell University (CU) and is now owned by WhitePine. As a supplement to our present discussion, you may also wish to consult CU's On-Line Documentation.
CU-SeeMe basically allows two computers to teleconference, but multiple computers may be connected by the use of reflectors, which are computers on the network running special software that allow a CU-SeeMe transmission from one computer to be "reflected" to many computers. One must distinguish the CU-SeeMe client software, which runs on Macs and PCs under the usual Mac OS and Windows operating systems, from the reflector software, which typically resides on network servers running either Unix or Windows NT operating systems. Our discussion will be concerned primarily with the client software; however, ambitious and well-supported educators may wish to enquire about setting up a reflector site.
Our tutorial will be based on
the freeware version CU-SeeMe 0.92b2 for Windows 95. Go to
this site for freeware still available. The program is also available for Windows 3.x;
the freeware version for that OS is 1.0)
A
commercial version
of CU-SeeMe is available
that offers additional features such as
technical support, color imaging (the freeware version is 16-level grayscale),
and a shared whiteboard (a window in which anything placed by a
conference participant becomes accessible to all).
For educators who register (registration is free) at GSN (Global SchoolNet) a discounted price of $35 a piece is given for up to 3 copies.
Technical Requirements
CU-SeeMe can be used in a receive-only mode, or in a 2-way
teleconferencing mode.
Naturally, teleconferencing requires at least two computers that can each
send and receive sound and visual data in digital form, and a network
connection between them. This means that
each computer must be connected to a
digital camera and a microphone, and each must have speakers in addition to the
screen display for the visual data. In the receive-only mode, which we discuss
in the next section, the only requirements are
a computer with speakers and
capable of displaying at least 16 levels
of gray, the CU-SeeMe software, and an Internet connection.
The network must recognize TCP/IP protocols, since the CU-SeeMe software assumes that. It is highly desirable that the network be fast, but that should influence only the quality of the teleconferencing, not whether you can do it, provided the network supports TCP/IP. In particular, this demonstration can be implemented over modem connections if they use TCP/IP protocols (e.g., SLIP or PPP connections). However, 28.8 kbaud is probably the minimal speed that you can expect to transmit unbroken sound, so anything less than ISDN speeds (56 kbaud or better) will probably leave much to be desired in terms of quality.
We shall assume that two computers are available satifying the above requirements and have the appropriate software installed. For the purposes of this demonstration, the two computers could be in the same room, or they might be very distant from each other. (You can even use a single computer to demonstrate many of the principles by making a connection to yourself after the local video window is opened.)
Before doing very much with CU-SeeMe, you may wish to become familiar
with these general rules of
CU-SeeMe Netiquette.
Teleconferencing with CU-SeeMe
Your own video image should come up in the local video window when
Cu-SeeMe is started if your video camera is properly installed and pointing
at you.
If not, reduce the number of colors your monitor will display to
256,
and try again.
If you continue to have problems,
see this list of
Frequently Asked Questions (and their answers!), as well as Getting Started.
Local Video Window
Open the "View" pulldown menu, select "Preferences", and fill in the
"Your Name" box (you can enter anything you like here; but if you use
your real name it will help identify you to the person with whom you'll
be conferencing).
The two lines below the video display provide information on the status of your data transmission and reception. The first line gives (left to right) frames/second (fps) being captured by your video hardware, the kilobytes/sec you are transmitting (once you begin to transmit), and the max kilobytes/sec you can transmit (the "cap"). The second line gives the status (whether you are receiving), the rate at which you are currently receiving, and the maximum reception rate that you can handle.
Good manners dictate that the cap on transmission rates normally not be more than 80kbps (kilobits per second), in order not to hog bandwidth from other users. The default settings will usually respect this, and reflectors may automatically disconnect you if this setting is changed to a number larger than 80kbps. To check or adjust your value, open the "View" pulldown menu and select "Preferences". Select the "Rates" tab on the "Preferences" window and edit the "Max. kbits/sec" box under "Sending" if necessary to make sure it shows a value of 80 or less.
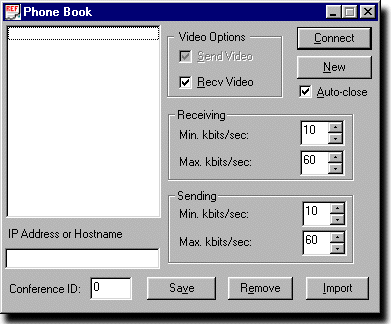
Making a Connection to Another User
Now we are ready to make a connection to another user. Open the "Conference"
pulldown menu and select "Phone Book".
The popup dialog box shown in the figure below should appear.
Type into the "IP Address or Hostname" window the IP
address of another computer that is running CU-SeeMe,
leave the "Conference ID"
at 0, and check that you will both send and receive video.
Check (and modify if necessary) the min and max rates for sending and
receiving, and finally select "Connect".
Remote Windows
If the other user chooses to accept your connection, a remote
window will pop up on your screen in addition to the local user window.
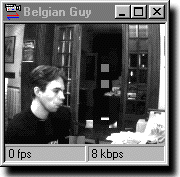 The title bar of a remote window shows the name of that user (as he or she
entered it in Preferences).
The status bar under a remote window's video display shows
the rate at which you are receiving from that user in both
frames per second (at left) and kilobits per second (on the right side of
the bar).
The title bar of a remote window shows the name of that user (as he or she
entered it in Preferences).
The status bar under a remote window's video display shows
the rate at which you are receiving from that user in both
frames per second (at left) and kilobits per second (on the right side of
the bar).
If you right click on the window, a menu appears with commands that let you freeze the display of video from this user or copy the window contents to the clipboard.
List of Participants in Teleconference
The 0.92b2 version of CU-SeeMe for Windows 95 shows the remote participants
in your current teleconference with a display in the
program's main window that is
similar in style to the listing produced for files and folders by the
Windows Explorer program; see the figure below.
The IP address of the remote connection is shown at the top of the list;
under this the various participants are grouped as "Visible Users",
"Hidden Users", or "Lurkers".
(Hidden users are those who are sending video but are not visible
in a remote window on your screen. Lurkers are not sending video, but are only
observing and listening.)
To the left of each of these category headings is
a box containing either a + or a - sign
(unless there are no current participants in the category).
If no entries are visible in the category but there is a box containing
a +, this means that the category list is "collapsed"; click
on the box to expand the list so you can view the entries.
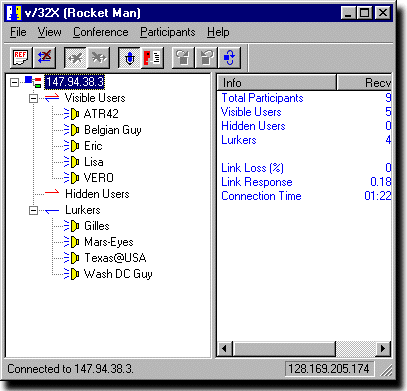
Next to the name of each user is a little speaker icon that may or may not have an image of "sound waves" coming from it. The absence of the sound waves indicates that you have turned off the audio for this participant. (To do this, right click on a name in the list. A menu will come up with commands that apply to that participant; one of the commands is "Mute Audio". Selecting this command turns off the audio from that participant.)
As participants enter, leave, or change their status in a teleconference, the participants list will change accordingly.
Controlling Audio Transmission and Reception
As noted above, audio from individual users can be turned on and off
by right clicking on their names in the participants list and using the
"Mute Audio" command.
Audio from all participants can be turned on/off globally
by accessing the
Audio window.
You control whether or not this window is shown
with either the "Audio" entry in the "View" pulldown menu or the microphone
button in the row of control buttons. At the bottom of this window is a
checkbox labeled "Receive audio".
If this box is not checked, audio reception will be disabled (from all participants).
Once someone begins to transmit audio, the Audio window will have a "Source" line at its top that shows the name of the conference participant that you are hearing. If all audio then stops, this line will appear gray and show the name of the last speaker. Below this are two level meters that indicate the volume levels of the sound you are receiving and transmitting. Finally, there is a "Push to Talk" button that you must press whenever you wish to transmit audio.
If you are using a modem or other low bandwidth connection, you may find it very difficult (or even impossible) to transmit both audio and video at the same time. In this case, you can go to the "Audio" tab of the "Preferences" window and check the box at the bottom labeled "Freeze local video when sending audio". While the frame is frozen it will display continuously as a video stillframe on other participants' screens. Since to a good approximation, only the part of an image that has changed from the last camera image sampling is transmitted, your video transmission rate will now drop to almost zero.
Although some other versions of CU-SeeMe include controls on the Audio window for adjusting the volume levels of received and transmitted audio, this version of the program does not. Instead, with Windows 95 you can use the Volume Control tool (accessed with the Start button via Start / Programs / Accessories / Multimedia / Volume Control).
Sending Text Messages
Since audio transmission
may suffer in low-bandwidth situations, CU-SeeMe provides
the means for typing text messages to your conferee.
Select "Chat" in the "View" pulldown menu, or click the chat button
in the tool bar (just to the right of the microphone),
to open the "Chat" window, which has two panels.
Anything that you type in the lower portion of
the split screen appears (after a return) in the upper portion of your Chat
window and in the upper portion of your conferee's Chat window
as well.
Similarly, anything typed by your conferee
into his lower screen appears in your upper screen.
Thus, this utility allows a 2-way, real-time communication similar to an IRC
chat session.
Each message in the upper portion of the window is prefixed by the name of
the person who typed it.
Here are examples of various CU-SeeMe windows.
The Phone Book
We have seen above how to make connections by typing the IP
address of a CU-SeeMe site into the "Phone Book" window that is
accessed from the "Conference" pulldown menu.
We may also use this window to store the addresses (and other information
needed for making a connection) of frequently-used sites.
Thus this window can be used to create a "directory listing" or "phone book"
of such sites (hence the window's name).
To add an entry to this list, we go to the Phone Book window and first click the "New" button. This brings up a window in which we can enter some text to name this entry. The name will appear in the listing at the left side of the Phone Book window; you don't have to enter any sort of "official" name here, just something that will later remind you what the site is. After you've entered this text, click "OK" and the text will be added to the list at the left side of the Phone Book window.
Next we enter the IP address or hostname of the site that we want to store, and information about sending/receiving rates, etc. just as we did before. Finally, instead of selecting "Connect" to immediately go to the site, we select "Save". This appends the information we just entered to a disk file named PhoneBook.pbx that CU-SeeMe maintains in the same folder as the CU-SeeMe executable program. (This is just a simple text file and you can look at it with any text editor if you're curious about its format.)
In the future, if you want to return to this same site, all you have to do is open the Phone Book window and double-click on the entry for this site in the list of site "names". CU-SeeMe will retrieve the information it needs from the PhoneBook.pbx file and make the connection. If you single click, the item will be selected (but you won't connect yet) and the information on the right side of the window will change to reflect the values previously saved for the selected site.
You can take your phone book list to another PC if you wish, by copying the PhoneBook.pbx file to the new machine (be sure to place it in the same folder there as the CU-SeeMe executable program). If you have additional phone book lists in other directories (for instance, you may have gotten some from colleagues), you can combine their entries with those in your list by clicking the "Import" button in the "Phone Book" window. When you do this, you will be prompted for whether or not you "want to use your rates when importing". If you click no, imported entries will maintain the same send/receive rates that they have in the original list (that you are importing from). If you click yes, the original rates will be ignored and the entries will be added to your phone book file with all now having the rates that you specified with the "Rates" tab in "Preferences".