Image Files | Changing Format
Changing Format
As we also noted earlier, most browsers will not presently display an in-line image in BMP format. Some graphics creation programs may allow you to export images in GIF or JPEG format (e.g., PhotoShop). For those that don't yet allow these options you should export the image as BMP and then use one of the many available conversion programs to convert the BMP into either a GIF or JPEG, which you can then include in your Web document and which browsers like Netscape will happily display in-line.
 One frequently-used graphics format conversion tool for Windows is
the shareware program Graphic Workshop (GW).
To use this program,
begin by using "Change Directory" under the "File"
pulldown menu,
as shown in the figure at right,
to specify the directory containing the file(s) that you want
to convert. The program will then show all of the files in that
directory (graphics files, text files, mixed text and graphics, etc.).
We'll refer to this display as the "directory window" (although it is, in
fact, the main GW window).
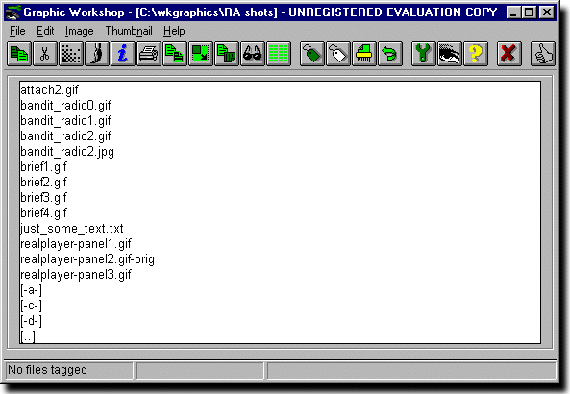
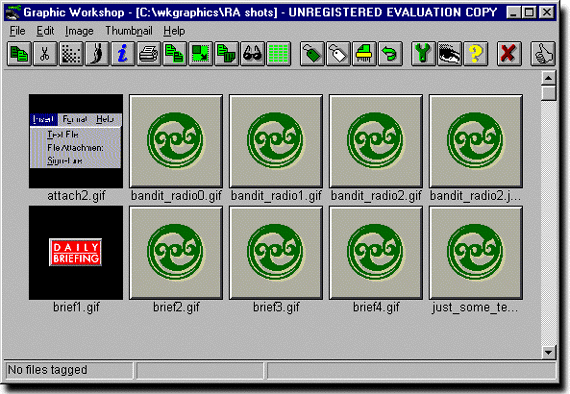
The directory contents can be shown
either as a list of file names (as in the first figure below)
or graphically (as in the second figure below),
using icons for
each file. In the latter case, a thumbnail version of each image can be
created for display in the directory window; a default icon (the "green tree"
image) is used for an image if there is no thumbnail.
The "thumbs-up" icon at the right end of the tool bar toggles between
the two display modes. For specificity, we assume a text listing mode
in the rest of this discussion.
One frequently-used graphics format conversion tool for Windows is
the shareware program Graphic Workshop (GW).
To use this program,
begin by using "Change Directory" under the "File"
pulldown menu,
as shown in the figure at right,
to specify the directory containing the file(s) that you want
to convert. The program will then show all of the files in that
directory (graphics files, text files, mixed text and graphics, etc.).
We'll refer to this display as the "directory window" (although it is, in
fact, the main GW window).
The directory contents can be shown
either as a list of file names (as in the first figure below)
or graphically (as in the second figure below),
using icons for
each file. In the latter case, a thumbnail version of each image can be
created for display in the directory window; a default icon (the "green tree"
image) is used for an image if there is no thumbnail.
The "thumbs-up" icon at the right end of the tool bar toggles between
the two display modes. For specificity, we assume a text listing mode
in the rest of this discussion.
To view an image, double click on the corresponding file name. This takes you to a full screen display of the image. Tools are available on this screen that allow you to manipulate or transform the graphic in a variety of ways. Click "Cancel" in this screen's menu to return to the main Graphic Workshop window showing the directory contents.
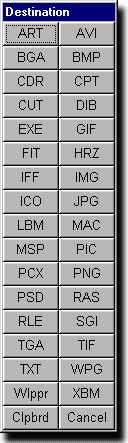 To convert an image to another format, single click once on the file name
and select "Convert" from the "Image" pulldown menu (or choose the Convert
tool from the toolbar; this is the leftmost button in the bar).
A window titled "Destination" will appear that contains a large number
of buttons arranged in two columns; each button corresponds
to a single graphics format. To specify the format that you wish to convert
to, just click the corresponding button.
To convert an image to another format, single click once on the file name
and select "Convert" from the "Image" pulldown menu (or choose the Convert
tool from the toolbar; this is the leftmost button in the bar).
A window titled "Destination" will appear that contains a large number
of buttons arranged in two columns; each button corresponds
to a single graphics format. To specify the format that you wish to convert
to, just click the corresponding button.
For example, suppose you have an image in gif format in a file named brief1.gif. To produce a jpeg version of the image, click on the file name in the directory window to select the file and click on the Convert tool in the toolbar. When the "Destination" window opens, click the button labeld "JPG". After a moment, the "Destination" window will disappear and the directory window will contain a new entry, brief1.jpg. Note that the original gif file has not been replaced; you now have two versions of the image.
You can also use the program to "batch convert" multiple files, in one or more formats, to a given single output file format. Just select the names of all of the files that you wish to convert before clicking on the Convert tool.
As indicated by the mention of manipulating and transforming images, format conversion is only one of Graphic Workshop's talents. But it can treat such a large number of graphics formats that the program may be worth acquiring even if you never use any of its other features.
Another Windows program that can be used for converting between numerous graphics formats is Paint Shop Pro (although it doesn't handle as wide a range of formats as GW does). PSP is actually a general purpose graphics creation and editing program, but it also has this format conversion capability. We will return to PSP briefly in this chapter's exercise.