Image Files | Homepage Exercise
Homepage Exercise
In this exercise we are going to cover several topics: how to capture screen images to a GIF file, how to rescale and crop an image, and how to add a link to the GIF image to your homepage.
The two pieces of software that we shall use are SnagIt, a screen capture shareware program for Windows, and Paint Shop Pro, another Windows shareware program that is a valuable asset in converting and manipulating images. (In fact, we could also use the latter program to convert images in formats such as BMP to either the GIF or JPEG format that is needed for inline browser display, but such conversion won't be necessary in the present example.)
Screen Capture with SnagIt
It is often important to be able to capture all or part of the computer display
screen. For example, many of the illustrations in this tutorial started off as
screen capture images.
The standard Windows operating system incorporates a rudimentary
screen capture via the <Print Screen> key,
but the shareware program SnagIt gives a far
richer set of possibilities.
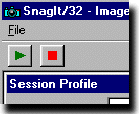
SnagIt Capture Modes
Open SnagIt by going to the folder that contains the
program and double-clicking its icon.
The resulting display should look like the figure below.
This window is divided into three basic sections.
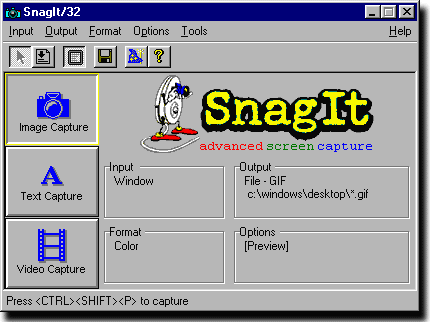
First, you control the program's method of operation by making selections from the menus shown at the top of the window.
Second, the hotkey combination that you press to initiate a capture is shown at the very bottom of the window. In the configuration indicated in the figure, you'd start a capture by pressing the <CTRL><SHIFT><P> keys simultaneously.
Finally, the remainder of the window shows the current selections for each of the pulldown menu topics. The three icons at the left of the window show the type of screen capture that the program can perform:
- Image Capture -- saves a snapshot of everything on part or all of the screen
- Text Capture -- saves only the text (but not any images) on part or all of the screen
- Video Capture -- saves part or all of the screen to an AVI movie.
The information shown to the right of the three icons reflects choices made in the other menus. We'll discuss some of the items in these menus next. (These selections indicated in the lower right of the window must be made with the menus; the fields in this part of the window aren't editable.)
SnagIt Input Menu
 The "Input" menu, shown at left, allows you to specify what you want the program to
capture. For our purposes, the most important of the available options are:
The "Input" menu, shown at left, allows you to specify what you want the program to
capture. For our purposes, the most important of the available options are:
- Screen -- capture contents of the entire screen
- Window -- capture contents of a selected window
- Active Window -- capture contents of the last window that was active before you started SnagIt
- Region -- allows you to use the mouse to select the area to capture
Output Menu
 The "Output" menu, shown at left, tells SnagIt what to do with the screen
capture. For our purposes, the most important possibilities are:
The "Output" menu, shown at left, tells SnagIt what to do with the screen
capture. For our purposes, the most important possibilities are:
- Printer -- print the captured area
- Clipboard -- save the captured area to the clipboard
- File -- save the captured area to a file
Format Menu
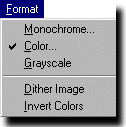 As should be obvious from the items shown in the figure at left, the "Format" menu
lets you specify whether to save the captured area in color, black and white, or
shades of gray.
But it also lets you save an image with a reduced number of colors (reducing
the size of your image file). In this case you may wish to select "Dither
Image" to simulate some of the original colors by blending together some of
those from the reduced set.
As should be obvious from the items shown in the figure at left, the "Format" menu
lets you specify whether to save the captured area in color, black and white, or
shades of gray.
But it also lets you save an image with a reduced number of colors (reducing
the size of your image file). In this case you may wish to select "Dither
Image" to simulate some of the original colors by blending together some of
those from the reduced set.
Options Menu
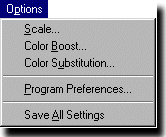 "Scale" lets you scale both the width and height of an image by the same
fraction (you can't distort the image by using different fractions for the
width and height). Note that the scaling factor applies only to captures
made after the scaling is set; it does not rescale a capture that has already
been made.
"Scale" lets you scale both the width and height of an image by the same
fraction (you can't distort the image by using different fractions for the
width and height). Note that the scaling factor applies only to captures
made after the scaling is set; it does not rescale a capture that has already
been made.
The "Color Boost" option lets you modify the amount of red, green, or blue components of the colors in your image. (The same adjustment is made to a given RGB component of every color in the image.) The "Color Substitution" option lets you replace any color in your image with any other color. Note that the color substitution only is used for captures made after the substitution is chosen. It does not alter the currently captured image.
This menu also allows you to select various "Program Preferences". One of these is the hotkey combination that you use to initiate a screen capture. By default, this combination is <CTRL><SHIFT><P> that we saw at the bottom of the first figure in this section. But this menu item lets you redefine the hotkey if you wish to do so. Whether or not you redefine the the key combination that begins a capture, the bottom of the SnagIt window always shows the current definition.
"Program Preferences" also allows you to change the hot key combination
that is used to repeat the previous capture. By default, this is
<CTRL><SHIFT><R>.
Tools Menu
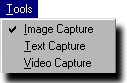 As we noted earlier, the "Tools" menu lets you choose the sort of capture that you
want to perform. That is, it lets you choose between a "still camera" tool to make
a snapshot image capture, a tool that lets you capture only the text but not the
images in a certain area, or a "video camera" tool to record a (presumably
changing) area of the screen and save it as a movie. As we also noted previously,
this choice of the type of tool to use for the capture can be made either by
selecting an item from this menu or by clicking one of the three icons at the
left of the SnagIt window.
As we noted earlier, the "Tools" menu lets you choose the sort of capture that you
want to perform. That is, it lets you choose between a "still camera" tool to make
a snapshot image capture, a tool that lets you capture only the text but not the
images in a certain area, or a "video camera" tool to record a (presumably
changing) area of the screen and save it as a movie. As we also noted previously,
this choice of the type of tool to use for the capture can be made either by
selecting an item from this menu or by clicking one of the three icons at the
left of the SnagIt window.
Review
In review, the SnagIt window would look like the first figure of this section if we chose to save an image capture in color of a region of the screen that we'll mark with the mouse. Once we've selected the region, we'll get a preview of what the capture looks like. We can then save to a GIF format file on the Desktop (i.e., in c:\windows\desktop).More information on any of the topics discussed above can be obtained from SnagIt's Help menu.
Example: Capturing a Screen Image to a File
We are now going to perform an exercise in which we will add a short tutorial
on the ftp client
WS_FTP LE,
complete with illustrative
pictures, to our developing homepage. As a first step, let us
capture three images from
this program.
To begin, let's capture the contents of an entire window.
Make sure that your copy of SnagIt is configured as shown in the first
figure of this section, except use the "Input" menu to select "Window". Then
If you now double-click on the
wsftp1.gif icon on the Desktop, you should see the figure below.
 The capture selection should now be displayed in the preview
window, only the top left corner of which is shown at right.
Save the selection to a file by either choosing the "Finish Output" option under
the "File" menu or clicking the green triangle button.
(To prevent the save you would choose "Cancel Output" under the "File" menu or
click the red square button.)
The capture selection should now be displayed in the preview
window, only the top left corner of which is shown at right.
Save the selection to a file by either choosing the "Finish Output" option under
the "File" menu or clicking the green triangle button.
(To prevent the save you would choose "Cancel Output" under the "File" menu or
click the red square button.)
For a second image to use in our tutorial, let's get a screen shot of the main WS_FTP window. After clicking the "Ok" button in the "Session Profile" window, it should disappear, leaving the main WS_FTP window (that had been in the background). Again use the <CTRL><SHIFTL><P> hotkey to begin a capture. Move the hand cursor until the entire main window is enclosed in the colored rectangle and click the left mouse button. When the preview window shows, click the green triangle to signal that you want to save the file. Save this image as wsftp2.gif on the Desktop.
This is quite a large image, so let's also have SnagIt capture a version of it at reduced size. Go to SnagIt's "Options" pulldown menu and select "Scale". In the window that opens enter 0.67 for the value of "Scale Image" and click "OK". Now repeat the screen capture of the main WS_FTP window, this time saving to a file wsftp2-small.gif on the Desktop. (This will save a version of the window whose width and height are each 2/3 of those of the previous full-sized version. We'll later use both size images in our tutorial.) Once you've saved this file, go back to "Options/Scale" and reset the value of "Scale Image" to 1.0 so that subsequent screen shots will not be inadvertantantly reduced in size.)
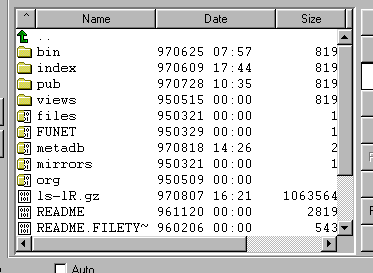
Finally, for our last image, let's make a shot that concentrates on
the list of files on the remote computer.
In this case, let's suppose we want to include in the image
not only the list of files in the right hand window of the main WS_FTP
display, but also the row of buttons above this list. The "Windows" input
option of Snagit won't let us get both the row of buttons and
the list of files in a single image unless we also include the window that
encloses both of these (in this case the entire main WS_FTP window).
So now let's switch SnagIt's input to "Region" in order to make
this capture like we want.
If you now go to the Desktop and double-click on this image files's icon,
you should see an image like the figure below.
Cropping an Image with Paint Shop Pro
We are now almost ready to create our tutorial and add to it the screen
shots that we just took. Since SnagIt allowed us to save the
shots as GIF files, we do not need to convert these to another format in
order to use the
shots as inline images. (SnagIt can also save screen captures
in other formats, including JPEG and BMP files. We also could use the former
as inline images without conversion, but not the latter.)
We do, however, want to make a slight modification to our last image. Recall that we intentionally were a bit sloppy when we made the capture using SnagIt's region method of selection. We could have tried to be more careful, but instead we purposefully saved a larger portion of the screen than we really needed to appear in that image. In fact, the reason for doing this was so that we could now illustrate a way to eliminate such unwanted portions of an image, a process known as "image cropping". SnagIt's region capture obviously allows you to perform image cropping before the fact (i.e., before the capture), since in a region capture you are required to specify the boundaries of the area that you want to save. But SnagIt does not provide a means for cropping an image after it has been captured. Since cropping an existing image is something you may frequently find useful, we will now discuss how it can be done with a popular shareware graphics program called Paint Shop Pro (PSP).
PSP is actually a general purpose paint program that allows you to create new graphics from scratch and edit and manipulate existing images in a number of ways. For our present purposes we use it only for cropping this one image, but you might find it a very convenient addition to your software collection if you are going to be doing a lot of work with graphics.
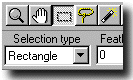 To use PSP to crop an image, first start the program,
then select "Open" under PSP's "File" pulldown menu.
Make sure the "selection type" is set to "Rectangle" and click
on the "Selection" button in the toolbar, as shown in the adjacent figure.
(This is the button labeled with a dashed rectangular square;
this will be the label
showing on the button even if the selection tool is set to some other
geometrical shape other than a rectangle.)
Place the mouse at a point that you wish to be one of the new
corners of the cropped image.
Press and hold down the left mouse button while dragging
to the opposite corner of the area that you want to keep in the image.
Release the mouse button.
Now go to the "Image" pulldown menu and select "Crop". This will trim the
image to the area that you have marked.
Choose "Save" under the "File" pulldown menu to save the cropped image.
You can now exit PSP.
To use PSP to crop an image, first start the program,
then select "Open" under PSP's "File" pulldown menu.
Make sure the "selection type" is set to "Rectangle" and click
on the "Selection" button in the toolbar, as shown in the adjacent figure.
(This is the button labeled with a dashed rectangular square;
this will be the label
showing on the button even if the selection tool is set to some other
geometrical shape other than a rectangle.)
Place the mouse at a point that you wish to be one of the new
corners of the cropped image.
Press and hold down the left mouse button while dragging
to the opposite corner of the area that you want to keep in the image.
Release the mouse button.
Now go to the "Image" pulldown menu and select "Crop". This will trim the
image to the area that you have marked.
Choose "Save" under the "File" pulldown menu to save the cropped image.
You can now exit PSP.
Although we haven't needed to take advantage of the fact in this example, one of the many features of PSP is its ability to convert between numerous graphics file formats. Thus, for instance, if we somehow obtained an image that we wanted to use on a web page that had been created by a Windows graphics program and saved in BMP format, or by some Macintosh program and saved in PICT format, we could use PSP to convert the image into either a GIF or JPEG file. (PSP, of course, can't read or write every graphics format, but it is quite versatile at format conversion.)
A Simple Example: Making a WS_FTP Tutorial
Open your homepage file index.html in your home folder and insert the
following HTML code at a convenient place:
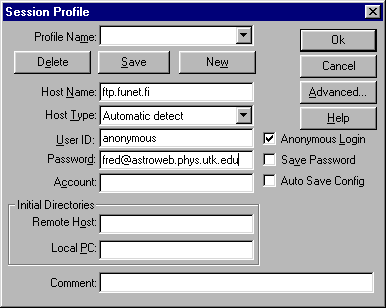
<h2>Using <tt>WS_FTP</tt></h2> The ftp protocol is used for transferring files between computers. You may use it to move files between various machines that you work on, or to download useful (or just fun) software to your machine from computers all over the world. All that is required is that both computers be connected to a common network (e.g., the Internet) and be running the ftp program. <p> One program that can be used for running ftp on Windows computers is <tt>WS_FTP</tt> (the noncommercial version of which is called <tt>WS_FTP LE</tt>). It is very easy to use. When you first start the program, you will see a "Session Profile" window, like that shown in the figure below, that prompts you for information needed to let you log onto the remote computer. <p> <center> <img src="wsftp1.gif"> </center> <p> In the "Host Name" box of this window you should enter the ip name or number of the remote computer that you want to contact. Below this you should enter your UserID and Password on that system. If you are logging in to a remote system by means of anonymous ftp, you only need click in the box labeled "Anonymous Login". |
Save the file index.html, point the browser at it, and reload. You should then have something like the following on your homepage:
|
Using WS_FTP
One program that can be used for running ftp on Windows computers is WS_FTP (the noncommercial version of which is called WS_FTP LE). It is very easy to use. When you first start the program, you will see a "Session Profile" window, like that shown in the figure below, that prompts you for information needed to let you log onto the remote computer.
In the "Host Name" box of this window you should enter the ip name or
number of the remote computer that you want to contact.
Below this you should enter your UserID and Password on that system.
If you are logging in to a remote system by means of anonymous ftp,
you only need click in the box labeled "Anonymous Login".
|
In this HTML example, the code
<center> <img src="wsftp1.gif"> </center> |
<img src="wsftp1.gif" align="left" vspace="5" hspace="15"> |
The construction <tt> WS_FTP </tt> says to render the word "WS_FTP" in "teletype font" (a fixed-width font often used to signify the name of a computer program). The remaining HTML in this example should be familiar from previous exercises.
ASSIGNMENT: Using the preceding as guide, add further explanatory text for the WS_FTP program, using the other two screen shots made in the above discussion. For the second figure in your tutorial, use wsftp2-small.gif as the inline image and link it to the larger wsftp2.gif.