Advanced Methods | Flash Shockwave
Flash Shockwave
Most of the software that we have used to illustrate Web techniques has been either freeware or shareware. This choice has been deliberate, to illustrate that one does not have to use expensive commercial software to do basic web educational development (but more sophisticated commercial software can certainly help with both with efficiency and quality if you do serious development). In the present case we make an exception and discuss a piece of commercial software, Flash 4 from Macromedia, because there is no freeware or shareware (and very little commercial software) that can rival it for producing sophisticated looking animation with a minimal learning curve. It is not that expensive (typically $100 or less with an educational discount at present), and presently you can download a free 30 day trial version from http://www.macromedia.com.
Note that the plugin to play Flash is free (it can be downloaded from the Macromedia site given above) . The program Flash 4 to produce Flash movies is the commercial product that we refer to here.
We are going to show you just enough to illustrate the power of the program. Specifically, we will show you how to make a basic animation, how to make a button to control the animation, and how to export and embed the animation in a Web page as a Shockwave file. That will be enough to suggest the kinds of uses that Flash Shockwave could be put to in your own Web development. We will assume that you have both Flash 4 and the Flash 4 plugin installed on your computer, and that you are familiar with the usual simple drawing tools found in many computer programs (arrow selection tool, rectangle drawing tool, . . .).
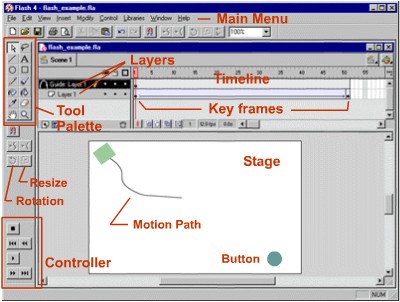
The Flash 4 Interface
The main interface for the program is illustrated in the following image.
We have labeled a few features that will be used in the examples discussed
below. Refer to the online help (under "Help" in the main menu)
for a more extensive discussion of the many features that we will not
discuss in this short introduction.
Creating a Symbol to Animate
Open Flash 4. First set the stage size and background color by
choosing "Modify" > "Movie". In the resulting dialogue
box, select 300 for the width, 200 for the height, and select a color
other than white (say a gray) for the background color.
Use the rectangle drawing tool (see the tool palette in the above image) to draw a small box on the stage and if it is not filled use the paint bucket tool to fill it with a color. Select the outline of the box with the arrow tool and delete it, leaving just the filled interior. We are going to do a motion tween on this box, which means that we are going to cause the computer to animate automatically between two images drawn in key frames. Flash requires that any object to be motion tweened be in its own layer on the timeline, and that it be a symbol. Be certain that you haven't put anything other than the rectangle into the current layer on the timeline (a pencil symbol indicates that a layer is selected; for now, there should just be one layer in the timeline). Convert the rectangle that you drew to a symbol by selecting it with the arrow tool, choosing "Insert" > "Convert to a Symbol" from the menu. In the resulting dialogue box, choose "Graphic" for the symbol type, and give it a name (whatever you would like). A small "+" now appears in the center of the rectangle, indicating that it is a graphic symbol.
You should save any computer work on a regular basis, so this is a good time to save what you have done so far. Choose "File" > "Save" and in the resulting dialogue box choose a directory and a file name (the Flash movie is saved with an extension .fla by default).
Inserting Frames in the Timeline
Now we are going to cause the box to move from one point to another on the stage. To do that, we need to insert some frames in the timeline over which the animation will take place. Go to the timeline and in the layer that contains your symbol (there should be only one layer if you have not added any others), left click on the first frame with the mouse, and drag over the number of frames that you want to animate in (about 50 would be a good number for this example). The frames selected should darken and stay dark after you release the mouse. Now, place the mouse in the last frame selected, right click, and in the resulting dialogue box select "Insert Frame". The frames selected should turn gray, indicating that they are now active frames. However, only the first frame should have a dot in it, indicating that it is a key frame. The distinction between those frames that are key frames and those that are not is important in what follows.