Advanced Methods | Adding a Button
Adding a Control Button
Let's do one more thing to illustrate the kinds of things that you can do: make a button to control the animation that we just created. We want this to be a nice button that gives positive feedback to the user, so we are going to make the button change color when the mouse is held over it, and change to yet another color when we mouse down on it.
In Flash, you can turn essentially anything into a button. We'll use a simple circle for our example, but the same technique can be applied to almost any image or text. First create a new layer on the timeline to hold our button by selecting "Insert" > "Layer" from the menu (or click on the white box with a "+" sign in it at the lower left of the timeline). Give the layer a name if you wish, or just leave it with the default name that the program assigns (like "Layer 2"). With that layer selected, go to the stage and use the circle tool to draw a circle filled with a color of your choice with an outline in a different color. Use the text creation tool from the tool palette to put the word "Go" centered on the circle.
Now, let's turn our circle into a button. This is actually pretty easy. We have to do basically two things. First, we have to define what the "states" of the button are going to look like. Second, we have to assign an "action" to the button. The first makes it look like a button; the second makes it act like a button. Let's start by defining the states of the button.
Defining the Button States
Select the circle (be sure to include the outline and the text label) that is going to become our button with the arrow tool and choose "Insert" > "Convert to Symbol" from the main menu. In the resulting dialogue box, check "Button" (be sure to select "Button" and not one of the other choices) and give the symbol a name like "my button", but the choice is up to you. Double click on the circle and in the resulting dialogue select the "Definition" tab. Click the pencil symbol at the bottom of the dialogue box to edit the button that you have just created. A new stage and timeline that is specific to the button symbol you have just created should appear. Because this is a button symbol, the timeline is now special. There are 4 cells labeled "Up", "Over", "Down", and "Hit"(see the image below). These 4 cells allow us to define the states of our button. In essence, a button in Flash is a 4-frame movie.
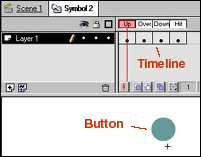 Drag the mouse over all 4 cells to select them and then right click
one of them and choose "Insert Key Frame" from the resulting dialogue
box. A dot should appear in each of the 4 cells, indicating that they
are now all key frames (see the adjacent image). The rest is simple: the
first 3 cells represent what the button is to look like when there is
no mouse over the button ("Up"), when the mouse is over the button ("Over"),
and when you click on the button ("Down"). The 4th box ("Hit") will be
used to define the "active area" for the button.
Drag the mouse over all 4 cells to select them and then right click
one of them and choose "Insert Key Frame" from the resulting dialogue
box. A dot should appear in each of the 4 cells, indicating that they
are now all key frames (see the adjacent image). The rest is simple: the
first 3 cells represent what the button is to look like when there is
no mouse over the button ("Up"), when the mouse is over the button ("Over"),
and when you click on the button ("Down"). The 4th box ("Hit") will be
used to define the "active area" for the button.
Leave the "Up" cell as it is, go to the "Over" cell and change the appearance of the circle to anything that you would like (e.g., by using the paint bucket tool to change its color), go to the "Down" cell and change the appearance again (for example, by changing to yet another color). Finally, leave the 4th cell as it is ,which means that the active area of the button will be defined by the circle of the button. When you are done, go the main menu and select "Edit" > "Edit Movie" to return the main movie stage.
Testing the Button
Now test the states of your button. Go the the main menu and be sure that "Control" > "Enable Buttons" is checked (it won't work otherwise, so be certain about this!). Now move the mouse over your button and mouse down on it. You should see the three states of the button that you just defined as you do this.
Assigning a Button Action
O.K., we have a pretty button that changes color when we put the mouse over it and click on it, but that isn't very useful. How do I get it to control the animation that we created earlier? The answer is that we must now attach an "action" to the button--- something that the program will do in response to clicking the button. To do so requires some real computer programming, but it will be very painless because the program is going to do most of it for us.
Go to the main menu and toggle off the check beside "Control" > "Enable Buttons" (we can't edit the button while it is enabled). Then double click the button, choose the "Actions" tab in the dialogue box, hold the mouse down over the "+" symbol in the top left part of the box, and in the dropdown menu that appears select "On MouseEvent". In the right part of the panel, for the Event check the box that says "Release". Then, go back the the left side of the dialogue box, hold the mouse down over the "+" symbol, and select "Play" from the resulting dropdown menu. In the display area of the dialogue box, the following sequence should now appear:
On (Release)
Play
End On
You have just written a little computer program: this sequence tells the computer that if the mouse is clicked on the button, when it is released it should play the movie you have created.
Now test the button. Select "Control" > "Enable Buttons", select the first frame of the timeline, and click the button that you just created and programmed. The animation should start when you click the button.