FTP | Anonymous FTP
Anonymous FTP
There are various implementations of the FTP protocol available.
We shall implement FTP with a piece of shareware called Fetch (it is
freeware for educational institutions).
Open the Fetch program by
double clicking on its icon.
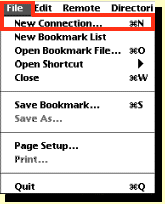
This will bring up an FTP login screen like the one shown in the image further down this page.
Making an FTP Connection
We are going to illustrate the use of FTP by making an
"Anonymous FTP Access". This means an access to an FTP server that allows
"Anonymous" logins: anyone can log in and get files by FTP, whether they have
an account on that machine or not. Such computers are called "Anonymous FTP
Servers".
The server we are going to log into is in Finland (the Internet doesn't care
very much about national boundaries!), and we are going to get a
file containing some software; computer types would say that we are going to
"download" a file.
Logging into the Server
Erase any entries in the fields of the main Fetch window
and enter the following:
(2)
In the "User ID" field, type anonymous.
(3)
In the "Password" field, type your email address; for example,
[email protected], but use your real email address.
(4)
In the "Directory" field type pub.
(5)
Click the "O.K." button.
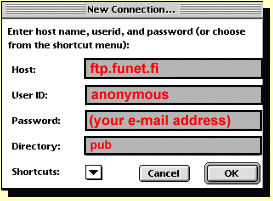 (1)
In the "Host" field, type ftp.funet.fi (the ".fi" ending on the IP
address tells us that this is a network in Finland.)
(1)
In the "Host" field, type ftp.funet.fi (the ".fi" ending on the IP
address tells us that this is a network in Finland.)
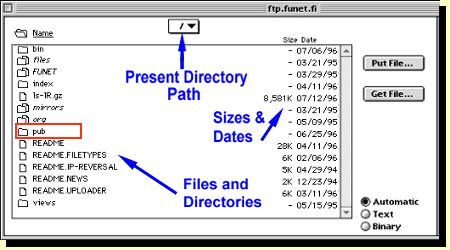
After giving the computer sufficient time to connect, you should get a display screen that looks approximately like the one shown below.
Finding the File
This display screen
shows the directories and files that are on the ftp server in Finland. We are
now going to change directories to find the file that we want to get. First
double-click on the entry labeled "pub"
in the display. This is a directory,
and double clicking on it will open it [you can tell that it is a
directory (or folder) because of the little folder symbol beside it].
Double-clicking "pub" brings up a list of directories and files that are in this directory. Scroll down and find the directory "mac". Double-click its icon to open this directory. The resulting display gives a list of files and directories inside "mac". Scroll down to the directory labeled "comm" and double-click to open it.
At this point we are inside the directory "comm", which is inside the directory "mac", which is inside the directory "pub". In computer jargon, we would say that the path to our present location is /pub/mac/comm, relative to the "root" directory for the FTP server on the machine we are accessing.
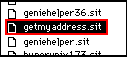 In the resulting list of files there should be one
called "getmyaddress.sit". This is the file that we are going to download, so
select it with one click of the mouse.
In the resulting list of files there should be one
called "getmyaddress.sit". This is the file that we are going to download, so
select it with one click of the mouse.
Downloading the File
Before we download,
we should try to decide whether the file is a text file, or a
binary file. The
suffix ".sit" on the file indicates that the file
contains material that has been "archived" and "compressed" using a
program called Stuffit. In this context, "archived" means that one or
more files or directories have been grouped together, and "compressed" means
that the files have been modified so that they
take up less space on the computer.
Such Stuffit files are always binary
files (see the discussion of
compression & archiving
in the Appendices).
Thus, we select the button in the lower right called "binary". In most cases, the button labeled "Automatic" will cause the Fetch program to make the correct selection of "Text" or "Binary" automatically, but if you know the format for certain it is better to specify it.
 Now we are ready to download. Just click on the button labeled "Get File ...".
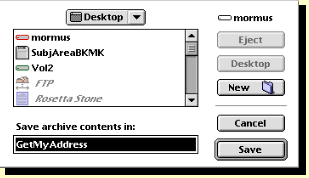
After a while (sometimes you may have to wait a minute or two if the server is
very busy) a screen like the one at the right should pop up asking where you
want to store the file on your computer, and under what name. Select the
default name in the box ("Get My Address") and the "Desktop" for the
destination.
Now we are ready to download. Just click on the button labeled "Get File ...".
After a while (sometimes you may have to wait a minute or two if the server is
very busy) a screen like the one at the right should pop up asking where you
want to store the file on your computer, and under what name. Select the
default name in the box ("Get My Address") and the "Desktop" for the
destination.
Now the file should download to your computer. It may take a few seconds, or a
few minutes, depending on how fast your network is and (usually most important)
how busy the ftp server is. While the file is downloading, information will
be displayed in the right portion of the Fetch window giving information
about how the transfer is progressing.
Using the Program We Have Downloaded
If Fetch is configured properly, it should have already launched a
program to uncompress and unstuff the file that you have just downloaded. Then
there should be a folder on your desktop called "GetMyAddress".
Open this
folder by double-clicking and start the program by double-clicking the program
icon, which is also
labled "GetMyAddress".
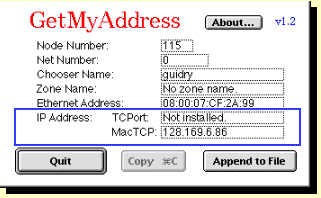
If all has gone well, you should get a display similar
to the one in the preceding figure that gives information about the
networking configurations for your computer. In particular, in the example
shown the IP address of the computer was 128.169.6.86. When you are finished,
close this window by clicking the square in the upper left corner.
Other Features of Fetch
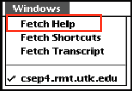 There are many other things that you can do with Fetch. For example,
you can use it to send a file from your computer to another computer
(often called "Uploading"), and you can configure it to do many things
automatically, like logging into ftp addresses that you use frequently. You may
find out about these things by reading the "Fetch Help" files,
that may be accessed
from the pulldown "Windows" menu, as illustrated in the adjacent figure.
There are many other things that you can do with Fetch. For example,
you can use it to send a file from your computer to another computer
(often called "Uploading"), and you can configure it to do many things
automatically, like logging into ftp addresses that you use frequently. You may
find out about these things by reading the "Fetch Help" files,
that may be accessed
from the pulldown "Windows" menu, as illustrated in the adjacent figure.
![]()